With Anki, you can learn incredibly well. However, especially in the beginning, it is not always easy to find your way around. In this post, I’ll show you 9 basic Anki skills you should know and master.
Here is an overview in case you are looking for something specific:
In a nutshell
- 1. How to See All Cards (Notes) in a Deck?
- 2. How to Create Subdecks in Anki?
- 3. Mark, Tag and Flag – How Does it Work?
- 4. Suspend and Unsuspend Cards & Notes
- 5. Delete Notes & Cards – How Does It Work?
- 6. Bury Cards and Notes
- 7. Move Cards Between Decks
- 8. How to Change the Card or Note Type in Anki
- 9. Download Shared Decks – This Is How It Works
1. How to See All Cards (Notes) in a Deck?
Sometimes it’s easy to lose track of which cards are included in a particular deck. Maybe you want to edit them. So how do you see all the cards in a deck?
Follow these simple instructions:
- Click on the desired deck in the deck overview.
- Click on “Browser”
- Select “current deck” in the left bar and click on it
- You now have an overview of all cards in the deck
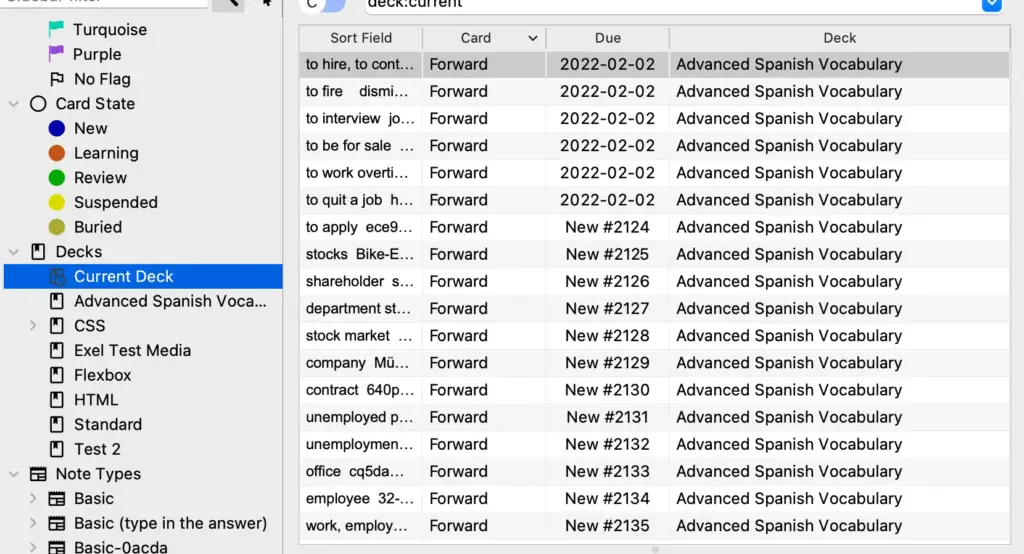
Info: With the button in the upper left corner you can switch between the cards and notes view. The difference between cards and notes is explained here.
By the way: I already wrote a post about how you can shuffle your Anki cards to not always get the same order if that interests you too.
2. How to Create Subdecks in Anki?
Cards in Anki are organized in decks. There is also the possibility to create subdecks (e.g. main deck: languages, subdeck 1: French, subdeck 2: Spanish).
Adding a subdeck is very simple:
- First, you create a normal deck by clicking on “Create deck”.
- You see the new deck in the overview
- Now you can simply take one deck and drag and drop it into another deck, just like in the file manager on your computer.
- The subdeck will then be displayed below the main deck. By clicking on the “+” and “-“ next to the main stack, you can expand and collapse the subdecks.
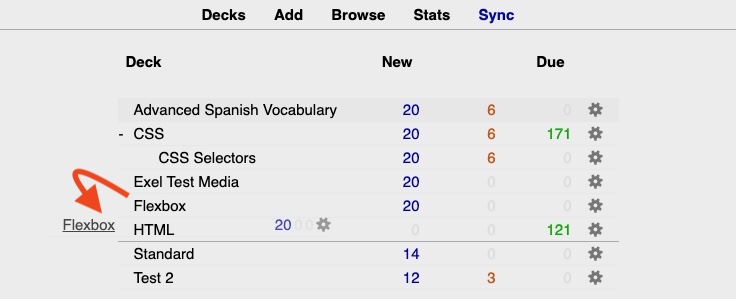
By the way, you can also add subdecks to other subdecks. I would recommend you not to overdo it though. 2 levels should be enough.
Decks and Subdecks – What’s the difference?
If you want to learn all subdecks, you can simply click on the main deck. However, for new cards, the subdecks are reviewed one after the other. So the cards are not mixed.
If you just want to learn the cards from one subdeck, you select this one and click on “Study Now”.
Tip: For further distinctions, e.g. between different chapters, it is advisable to use tags instead of subdecks. This is also recommended by the Anki developers. How to do this you will learn in the next point.
3. Mark, Tag and Flag – How Does it Work?
Decks should be understood as very rough categories in Anki. Therefore it is not recommended to create too many different decks and subdecks. This is explained among other things in the user manual.
Distinctions into different subtopics and chapters should rather be made with tags. In the card browser, you can then filter for these or use them to create filtered decks.
All in all, there are the functions “Add tags”, “Toggle Mark”/ “Mark note” and “Flag”.
Add Tags
You can easily add tags in the card browser. In fact, you can only add tags to notes, not to the individual cards. (Click here to read about the difference).
Tagging instructions:
- Select the cards or notes you want to tag.
- Then click either in the top menu (Notes) or with the right mouse button on Notes > Add Tags

- In the next window, you can simply add one or more tags (separated by a space).

You will find the added tags in the left sidebar at the bottom. If you click on one of the tags, only the notes that have this tag will be displayed.
This is how I do it. But you can also add tags directly when creating a note or learning.
Example: In a big deck of Spanish vocabulary, you could use the tags to divide the terms by word types (nouns, verbs, etc.), for example.
Learn cards with a specific tag
Of course, once you’ve divided up the cards, you’ll want to have the option of studying only the cards with a particular tag.
This is how it works:
- In the deck overview or in the card browser you click on Tools (or Edit) > Create Filtered Deck.
- In the next window, you first choose a name for the new deck and then you enter “deck:(name of the original deck) tag:(keyword you want to filter by) in the Search field.
- Then you click on “create”
- The new temporary deck will now be displayed in blue in the deck overview and you can learn it as usual.

Flag cards
Besides the keywords (tags) there are also colored markers (flags). You can assign these to individual cards to organize them.
You can mark the cards either in the card browser or directly while stuying under “More” in the lower right corner.

Tip: Use the mark function for finer distinctions within tags or for temporary problems (e.g. red if the map is not complete).
Mark notes
Notes can be marked in addition to tags. Here there are no different colors, keywords or similar. A note can either be marked or not.

A marked note is highlighted in the card browser. Additionally, it automatically gets the tag “marked”. This makes it easier to find marked notes.
You can highlight notes either via the map browser (“Toggle Mark” or directly while studying via “More” > “Mark Note”.)
Flagging vs. marking – What is the difference?
You can only flag single cards. For this, you have 7 different colors to choose from, whereas “mark” refers to the entire note.
If you don’t have very big decks, I would recommend mainly using tags for structuring and to use “Mark” and “Tag” only temporarily, e.g. if you want to find the cards or notes quickly in the browser.
4. Suspend and Unsuspend Cards & Notes
Suspend cards and notes
The “Suspend” function hides a card or note from review until it is manually unsuspended in the browser. This is useful when you don’t want to delete cards or notes, but don’t need them for the time being.

Most of the time, you use the option while learning when you realize that the card or note currently isn’t relevant. To do this, click on “More” in the lower right corner and select either “Suspend Card” or “Suspend Note”.
Additionally, you can also activate the function via the card browser (“Toggle Suspend”.)
Unsuspend cards and notes
A suspended card or note can only be unsuspended in the browser. Simply right-click on the respective element and select “Toggle Suspend”.
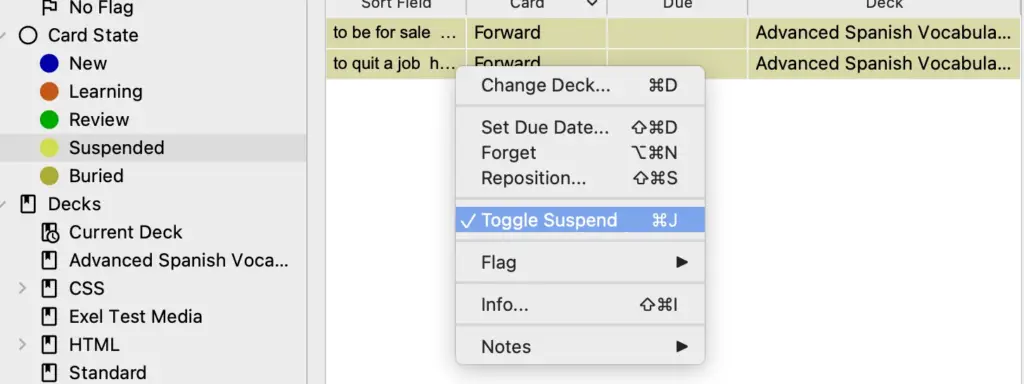
Afterward, the cards will appear again in the review while learning.
Suspend cards vs. notes – What is the difference?
If you choose the “Suspend note” function, all cards of this note will be hidden from the review for the time being. If you only choose “Suspend card”, this will only apply to this one particular card. Other cards of the same note will still be displayed.
5. Delete Notes & Cards – How Does It Work?
If you create a lot of learning material, sooner or later you will want to delete something. Here it is important to keep in mind: You create and delete notes!
In fact, you can’t delete single cards in Anki straight away, because otherwise they would simply be created again automatically the next time you edit the corresponding note.
Delete a note
Deleting a note is very easy via the card browser:
- Click on the respective card or note
- Choose “Notes” > “Delete Note”
- Or quickly during learning select “More” > “Delete note”.

Note: If you delete a note, you will not only delete the note but also all related cards.
Delete cards
If you want, there is the possibility to delete single cards. It is just a bit complicated.
To delete a single card you first have to empty the individual fields and then you can delete them via Tools > Empty Cards.

Often it is enough to simply suspend a single card.
6. Bury Cards and Notes
With the function “Bury” you can postpone the review of cards in Anki to the next day. This is handy if you want to plan the card for tomorrow while learning without having to adjust the interval or something like that.
As with the other functions, if you bury a note, this will automatically apply to all associated cards.
Instructions for burying cards and notes
You can only bury cards and notes while learning.
Just click on “More” and choose either “Bury card” or “Bury note”.

7. Move Cards Between Decks
Sometimes you may want to move certain cards from one deck to another without having to recreate the cards. This is how you do it:
- Select one or more cards (all of them if you want to merge two decks) and right-click.
- Then click on “Change Deck”.

- In the next window select an existing deck or create a new one by clicking on “add”.
- Finally, click on “Move cards”

8. How to Change the Card or Note Type in Anki
The card type of a card determines all available fields and their layout for the corresponding card. This means, for example, that there is always an image and a text on the front side and the solution in text form on the backside.
However, the card type is based on the note type. So you have to change the note type to change the card type. To do this, you proceed as follows:
Instructions:
- Select the cards you want to change in the card browser.
- Click on the right mouse button and choose Notes > Change Note Type
- In the next window you can select the desired note type
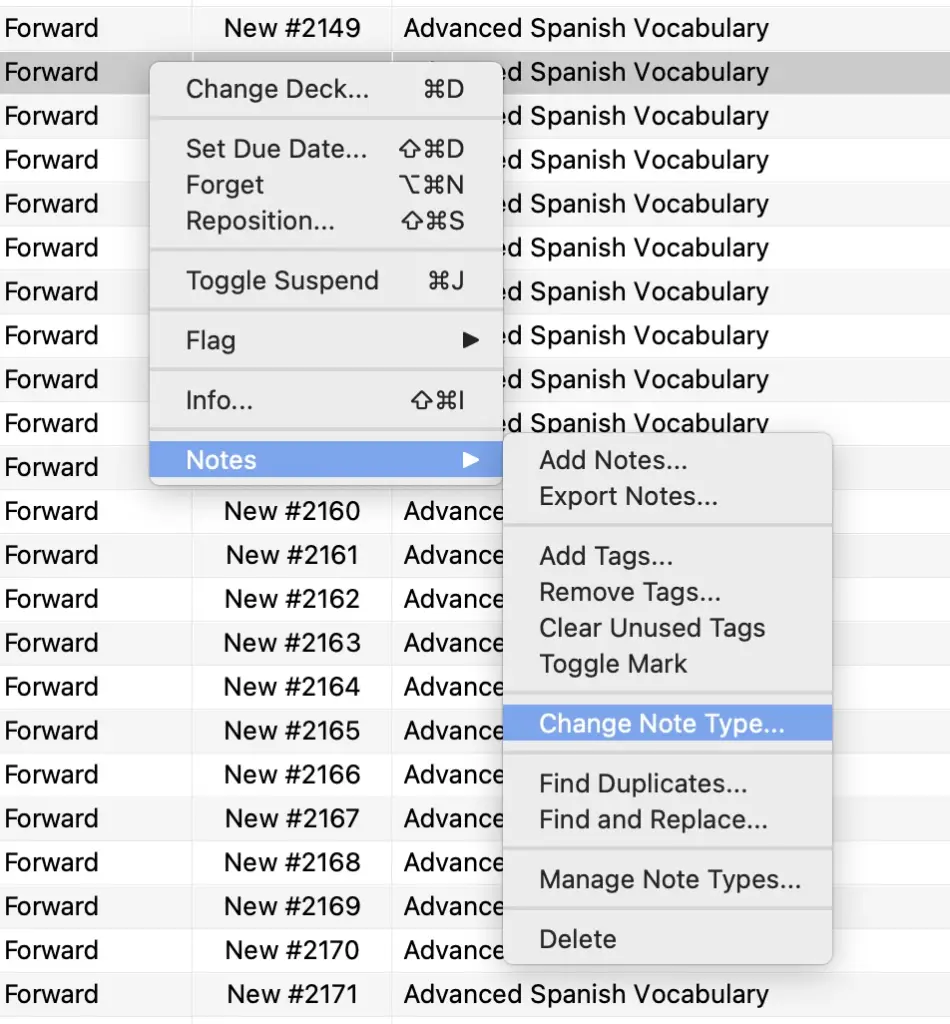
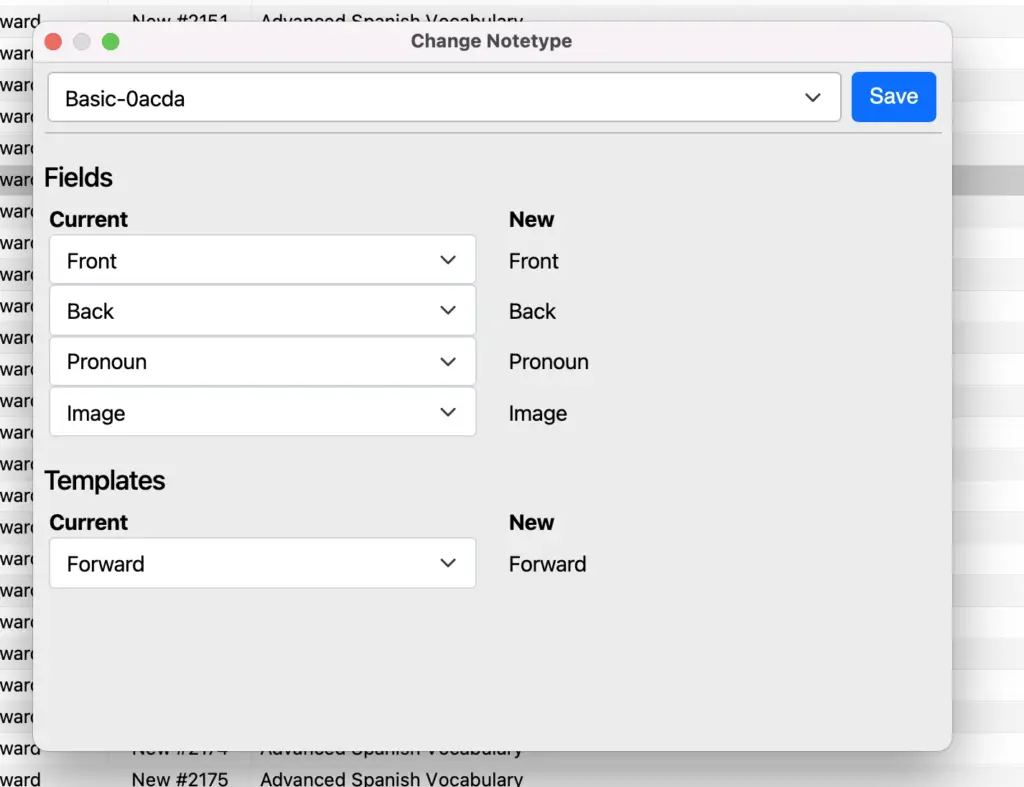
Note: If necessary, you have to create the new note type first. Just go to Notes > Manage Note Types.
By the way: if you want to know how to add pictures to your Anki cards and notes quickly and easily, you should check out this article: Adding Images in Anki – The 3 Best Ways
9. Download Shared Decks – This Is How It Works
A big advantage of Anki is the large community. This way, you don’t always have to create all the cards yourself. Most of the time, there are already pre-made decks available, which you can just download for free.
Instructions
- You can find shared decks on the Ankiweb site. There is also a link directly in the deck overview on the button “Download deck”.
- Here you can either click on one of the most popular categories or directly search for a topic.
- The shared decks are automatically sorted by rating.
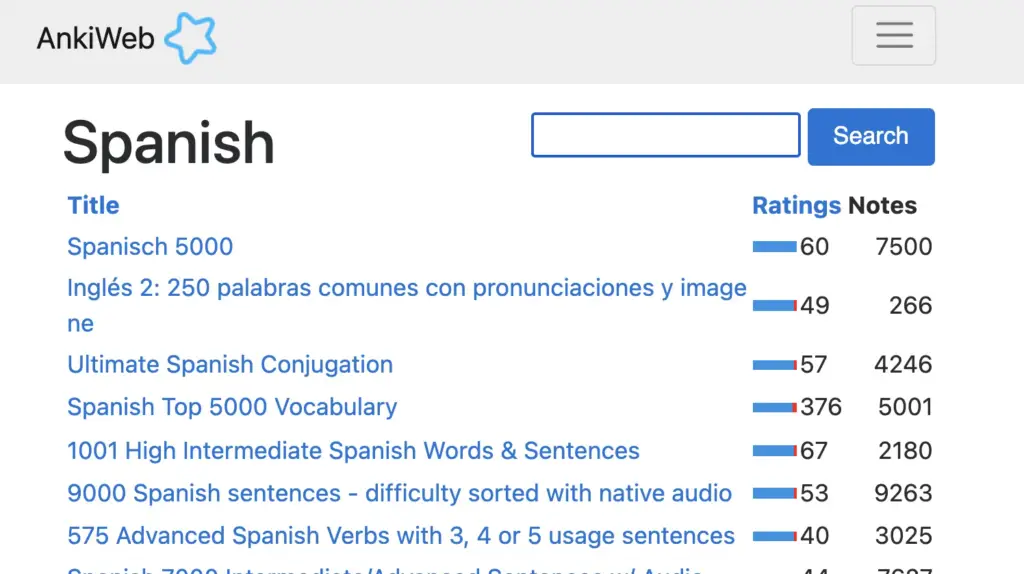
Tip: If you are searching for something in particular I would recommend to just google it, since google has a better search function.
- If you click on one of the decks, you will find additional information, such as a description, tips, an overview of the fields, a preview, etc.
- You download a deck by clicking on the download button at the end of the description.
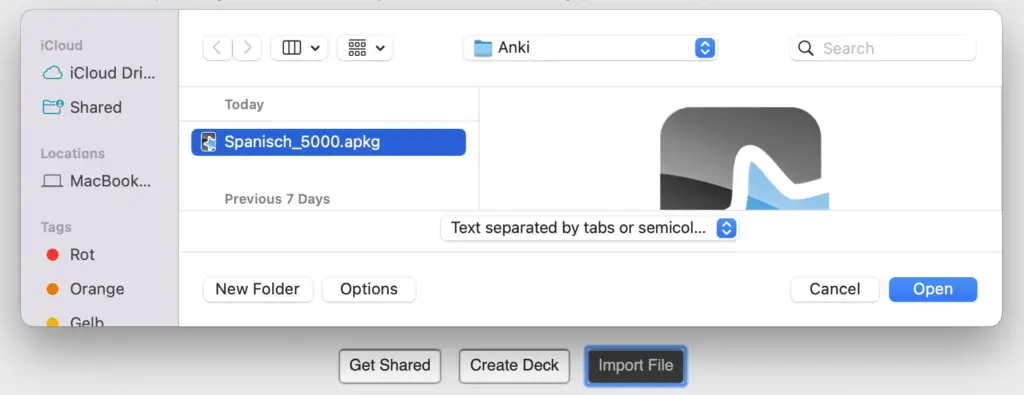
- Then click the “Import File” button in Anki and select the downloaded deck.
- The new deck should then appear normally in the deck overview.
Hopefully, these short instructions could help you. Continue with Anki and always remember
Study smart, not hard 🎓

