With Notion, you can organize your complete studies. From notes to schedules to to-do lists, you can bundle everything in this one tool. By default, Notion impresses with a very lean, minimalistic design. In this post, you will learn 9 tips on how to make your Notion setup more beautiful.
1. Use templates for students
A big advantage of Notion is that you don’t have to start from scratch. Because a large community of students uses Notion to organize their college life. Therefore, my first tip to make Notion more beautiful is to first look at the student templates that already exist.
Make a list of all the pages for your ideal setup. No matter if you need to create them first or if you have already created them. Because it is crucial that you set the structure, as it is right for you.
If you need inspiration for this, I can recommend the following video:
”Which pages do you need?
Of course, this varies depending on the extent to which you use Notion. But most students will need these types of pages:
- Home page with links to the subpages
- ToDo list for your assignments and submissions
- Calendar with all important dates
- Study plan
- Grades Dashboard
- Pages for each of your subjects (+ subchapters)
Where to download templates?
There are countless templates for Notion on the Internet. Many are free and some you have to buy. But first, you can always look in the template gallery of Notion itself and search for the appropriate pages.

You will find a list of many different templates that you can preview before duplicating them.
2. Choose a color scheme
To give Notion your personal touch, you should consider how you want to color your entire interface. This way you can achieve a similar look across all pages.
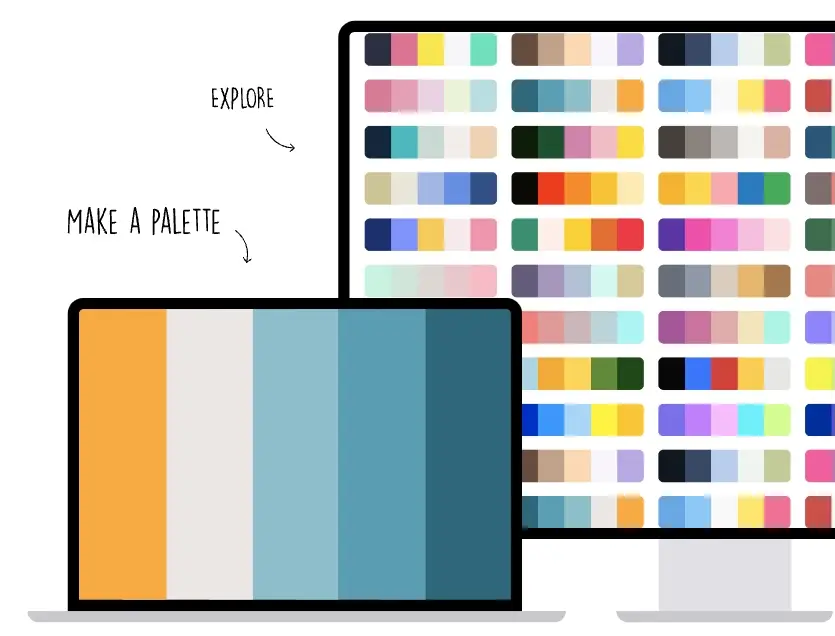
This is not only a design issue but also helps you to find your way around each page.
Example: Give all important blocks and texts the same color to find them quickly.
You can get some inspiration for nice color palettes on this page: https://coolors.co
3. Choose your font style
After the color, we continue with the font. On every page that contains text, you can choose your font style via the page settings (the 3 dots in the upper right corner).
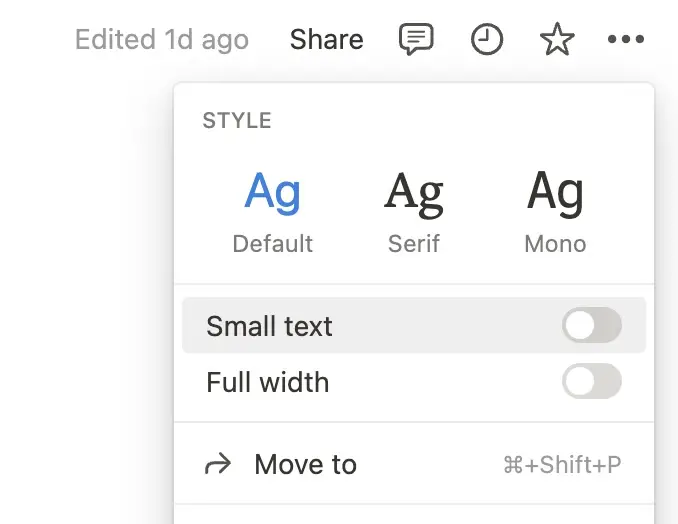
The options are as follows:
- Default: Sans-Serif font
- Serif: Serif font
- Mono: Easily readable font.
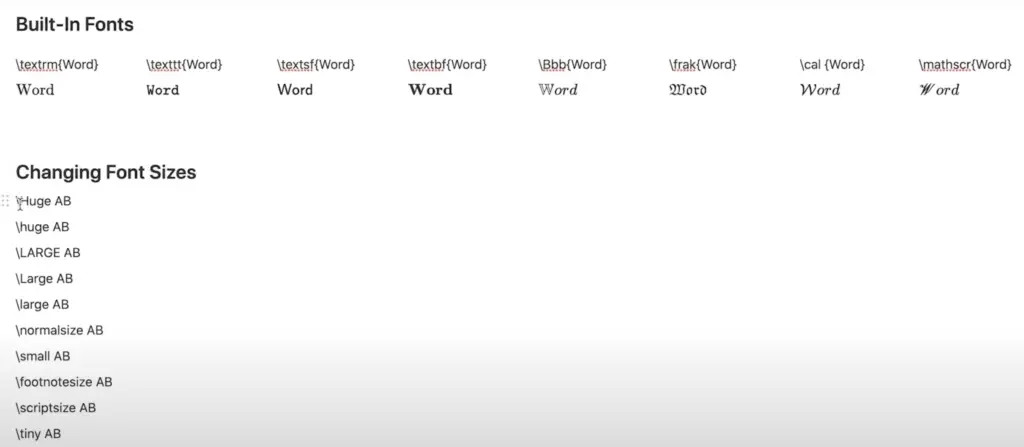
Text block with individual font
If you want to use a special font for a text block, there is the possibility to change the style (and the font size) with a command.
You just have to use the following shortcuts:
Change font in text – 8 fonts are integrated:
- \textrm{here your text}
- \texttt{here your text}
- \textsf{here your text}
- \textbf{here your text}
- \Bbb{here your text}
- \frak{here your text}
- \cal{here your text}
- \mathscr{here your text}
To convert these commands to text, you must insert two dollar signs before and after them, e.g. $$\textrm{here your text}$$.
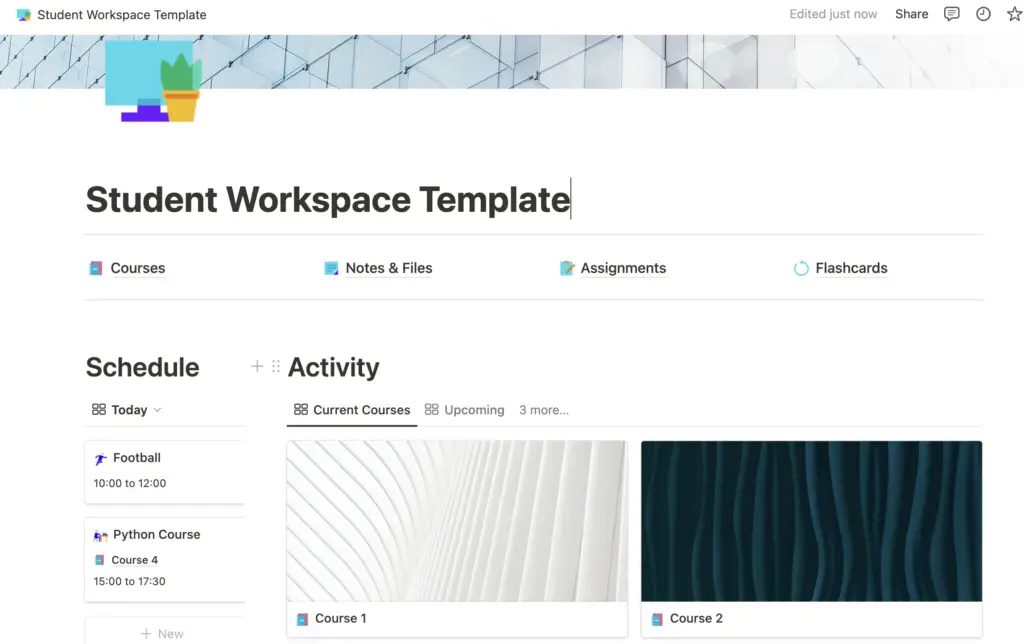
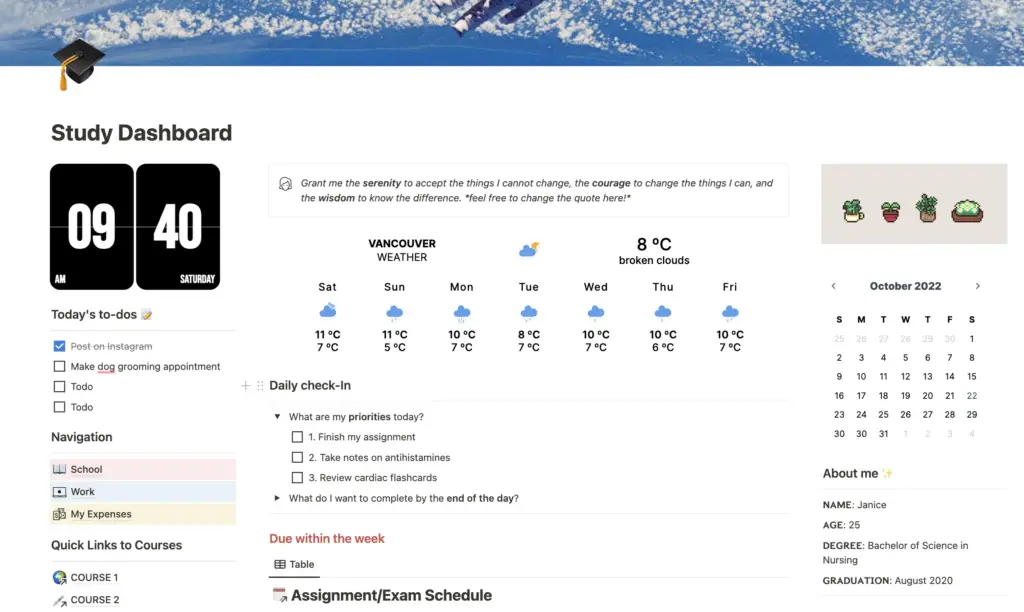
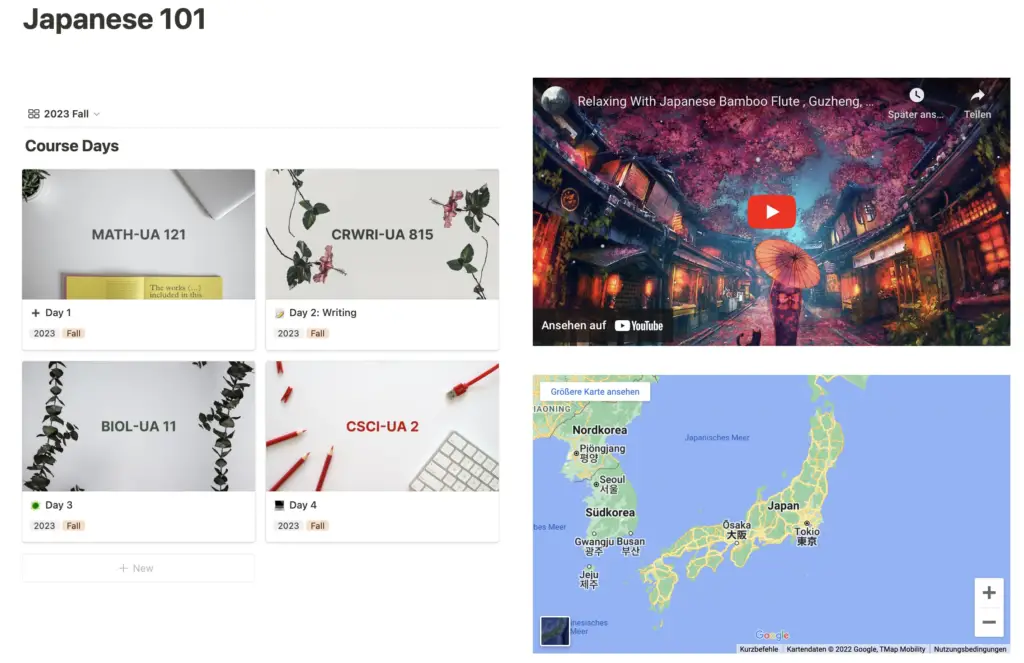
4. Design your home page
In Notion, you should have a home page that gives you a quick overview of everything important, as well as links to the most important pages. This page – call it Hub or Dashboard – is your first point of contact in Notion. Therefore you will see it most often.
And the page you see most often should be beautiful, of course. Also for this,you can simply download a template, like this one here.
…or you can design it yourself
The page should or can contain the following elements:
- Beautiful cover image
- Matching icon
- Calendar
- ToDos for today
- Navigation to the most important pages
- Next important dates
- Notes and progress indicators
5. Design a beautiful header for each page
In Notion, you can make every page unique with the header area. With a matching cover image, icon, and title, you can tell which page you are on at first glance. This not only looks good but also helps with navigation.
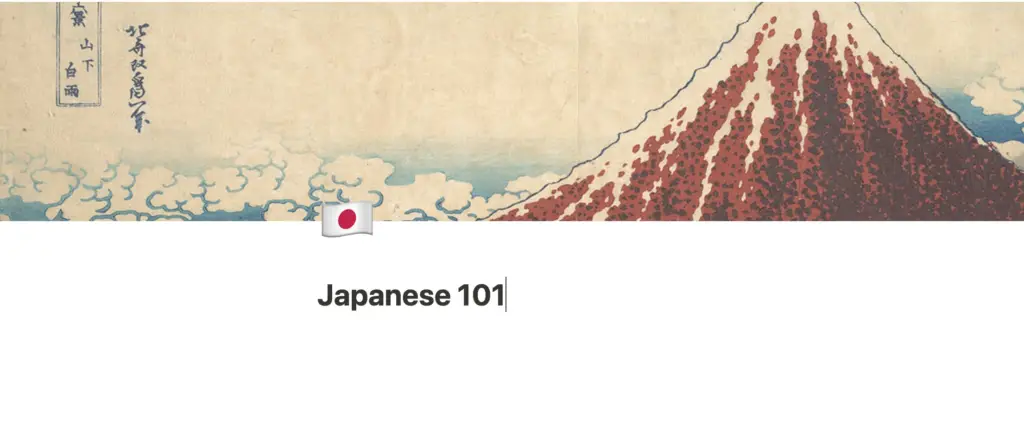
Add (or change) the cover image
To set the cover image, simply hover your mouse over the title in the upper left corner and select “Add cover”. Notion will then select a random image as the cover.
You can then change this as you wish. Just move the mouse over the image and select “Change cover”. After that, you have several options for choosing your new cover.
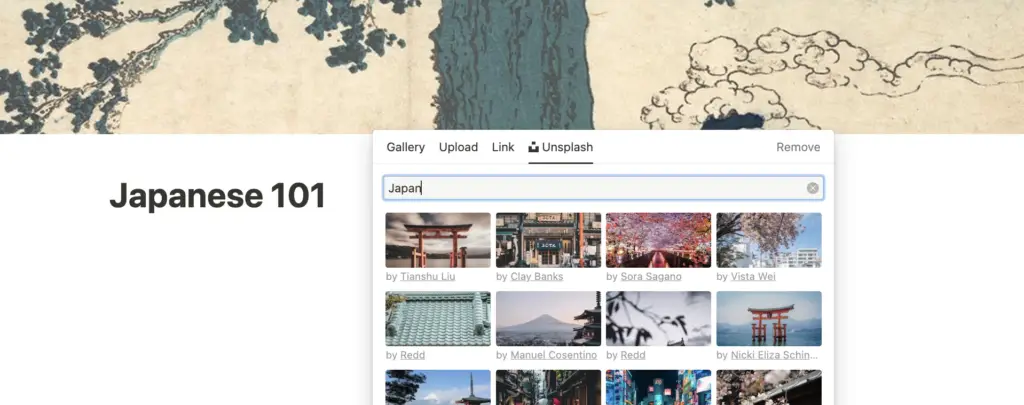
You can…
- choose images or simple color backgrounds from the gallery
- upload a picture
- upload a picture with a link
- choose a stock photo via Unsplash
Afterward, you can position the image as desired via “Reposition”
Add an icon
The icon is a small picture on the left side. To add it, hover over the title – as you did with the cover – and select “Add icon”. Then a random icon will appear first.
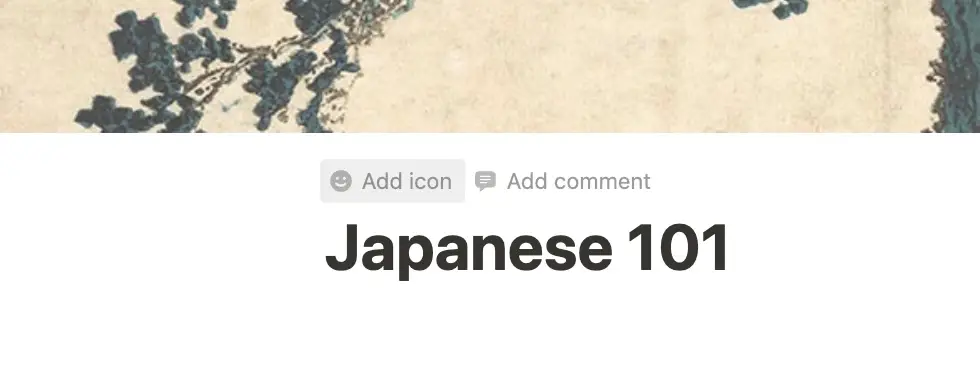
To change this, you just have to click on the small image. Here you can choose between the common emoji symbols, monochrome icons, or your own images, which you can upload.
Add title
If a page does not have a title yet, you just have to click on the placeholder text “Untitled” and enter the page heading.
Choose a unique and descriptive title for the page to always quickly identify where you are.
6. Use images and emojis
You can use images and emojis in Notion not only in the header area but everywhere. They can help you find your way around a page or serve as a complement to the written text.
Add images
There are many ways to add images in Notion. The operation here is very intuitive
You have the following options
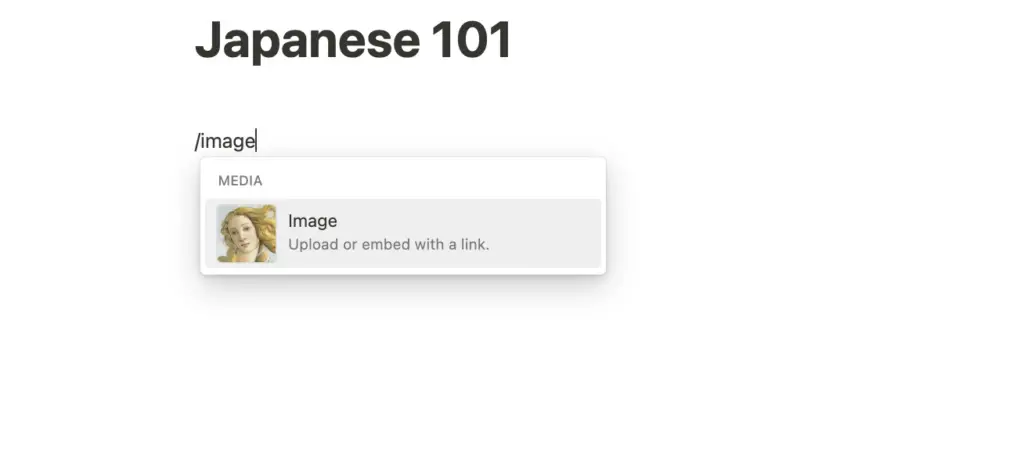
- Add images via the image block: Create a new block and select Media > Image. The fastest way to do this is to type “/image” in a text line. Then you can either upload an image, specify an image URL or directly select a stock photo from Unsplash.
- Paste images by copy & paste: If you have copied an image, you can simply paste it where you want and Notion will display it correctly.
- Paste images by drag & drop: You can also drag and drop images from your files to your Notion page.
Use emojis on pages
There is a separate block for emojis in Notion. So you can either just type “/emoji” or create a new block and choose Emoji under Inline. You can then easily add one of the default emojis like a character in your text
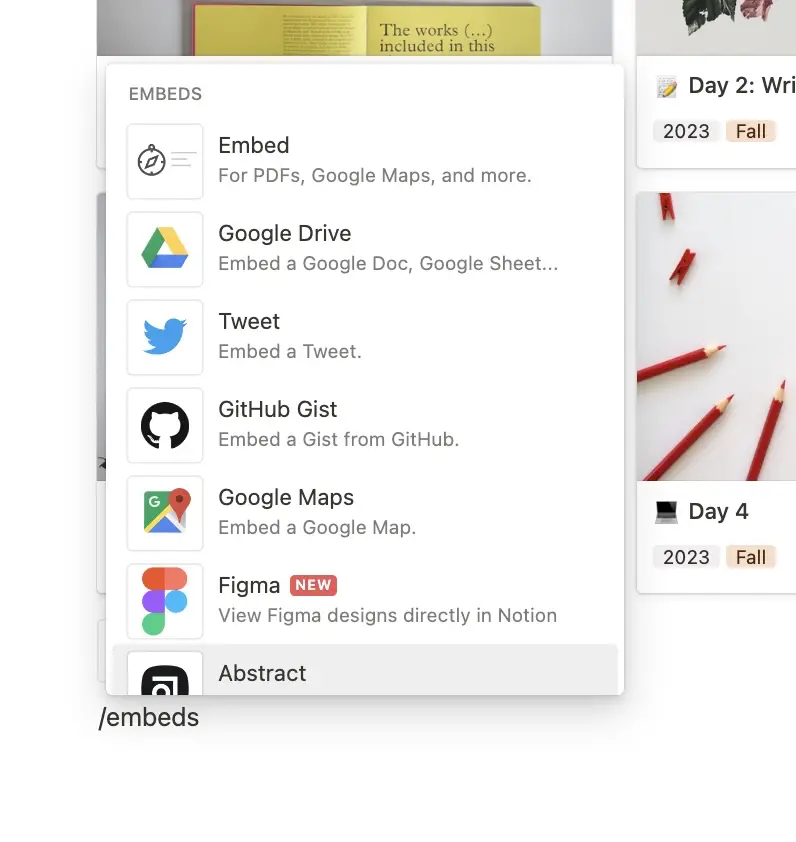
7. Use the embed function of Notion
One of the biggest advantages is the flexibility that Notion offers you with its embed function. There are almost no limits here:
- Add files like videos, audio, or PDFs to your pages
- Embed applications from your Google Drive, e.g. Google Sheets, Docs or Slides
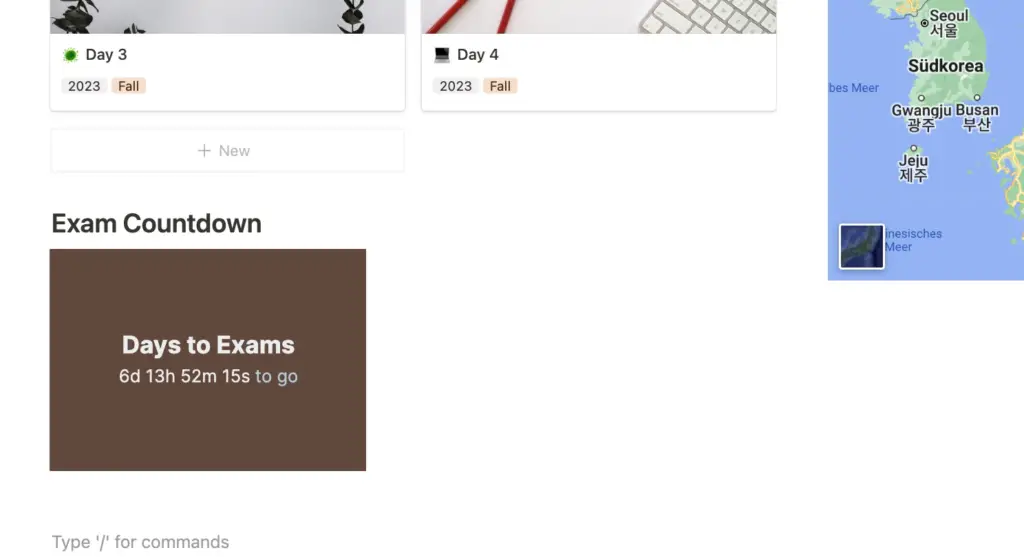
- Place various widgets, like countdowns, progress bars, and tiles.
And that was just a small excerpt of what you can do with embeds.
How do you add embedded elements?
Like most things in Notion, it’s pretty simple. Just type the following “/embeds” in a line of text. In the window that opens, you’ll get an overview of all the elements you can embed on your page.
Depending on what you want to embed, you will of course have to follow additional steps. For example, you have to link your Google account before you can embed your documents in Notion.
Unfortunately, it would go beyond the scope of this article to explain every embed option. As one of the most common cases, -, especially in studies – there is an extra article on the use of PDFs: Embed, import and export PDFs.
What are widgets and how to use them?
Widgets are small elements that can be embedded, such as clocks, calendars, or progress bars

However, you can’t create them directly in Notion but have to use third party websites like indify.co or widgetbox.app
There you can choose from many different widgets, customize them according to your needs and then add them via a link in Notion for free.
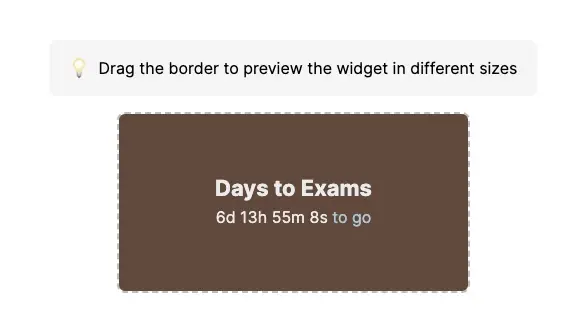
How to add widgets?
Here you just have to copy the widget link. Then you go to “Embed” in Notion, then to “Embed link” and paste the widget link there.
Then your widget will appear as a block on your page.
8. Use divider blocks
There can be a lot of content on a Notion Page. This can quickly become confusing. One tool you should use for a better structure on your page is dividers
These are gray horizontal lines that help you to separate different blocks from each other. This way you can group the content of a page better.
To create a divider you can:
- Enter several hyphens in a text line: “—“
- Or add a corresponding block (e.g. via “/divider”)
How to design a divider
Unfortunately, there is only one divider in Notion so far: the thin, gray line. There is currently no way to change it. Neither the color nor the thickness.
But of course, there is still a way how you can insert any horizontal line in Notion. And that is via a customizable line of JavaScript Code.
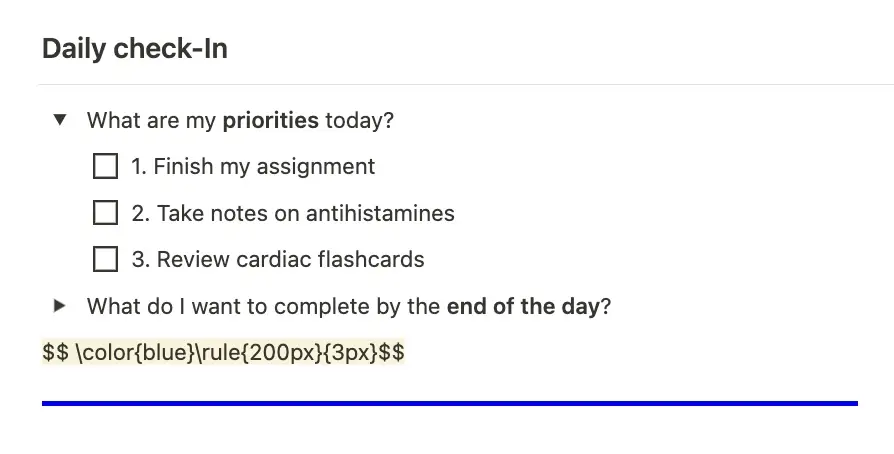
Just insert the following line of code in a normal text block
$$\color{red}\rule{5000px}{3px}$$- Change color: enter another color, e.g. color{blue}
- Change width and thickness: enter a different number of pixels, e.g. {2000px}{5px}
9. Format your text
The last tip can be applied to all areas where you work with text: If you format your text nicely, you will find it easier to read and work with later.
What is meant by formatting?
- Structure your text with appropriate headings and subheadings
- Use many paragraphs => too long text blocks are confusing.
- Work with color markers
- Highlight important parts of the text in bold
In addition, you should not always use the standard text block of Notion for text. Because Notion offers much more:
- Different lists: checklists, bullet point lists, toggle lists
- Different text blocks: standard, quote, callout (for highlighting)
- Other options: E.g. tables
More beautiful AND more productive in Notion
I hope you were able to take away some helpful tips from this post. It makes perfect sense to think about how you can make your Notion setup more beautiful and personalized.
Just like a nicely decorated apartment, you’ll find that you’ll love spending time there even more. Your productivity and learning success will thank you.
Study smart, not hard 🎓