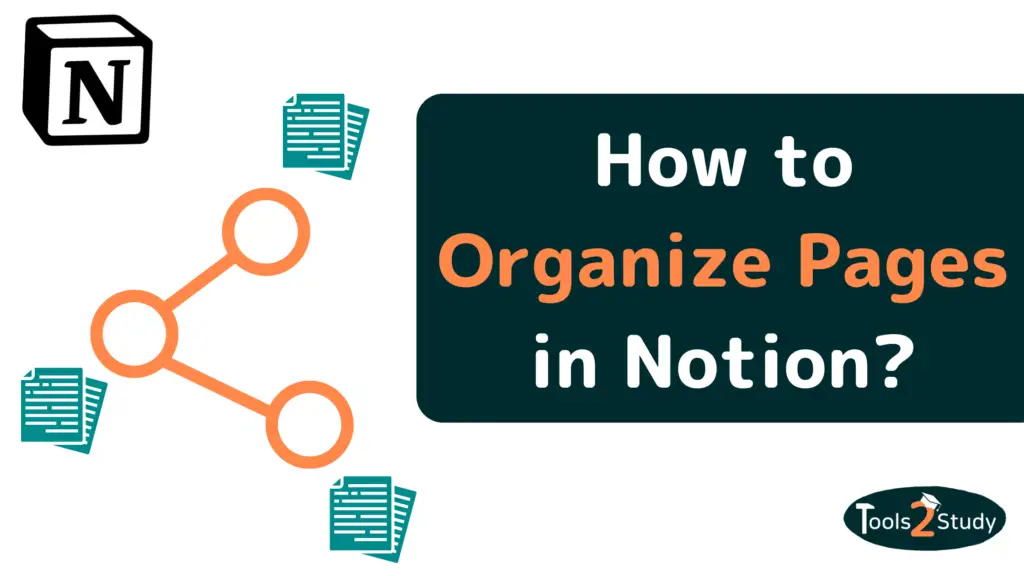
As a Notion user, you know how powerful the tool can be for organizing and managing your work. But with so many features and options, it can sometimes be overwhelming to keep everything organized. In this post, I’m going to share 9 tricks that I’ve found helpful for organizing pages in Notion.
These tips will help you make the most of the tool, and keep your work organized and easy to navigate.
- 1. Add a "Table of Contents" to Long Pages
- 2. Use the "Page Link" Block For Quick Links
- 3. Make Use of Subpages
- 4. Use Custom Properties like “Tags”
- 5. Organize Pages by Grouping Them Together
- 6. Use the Breadcrumbs to Navigate Page Hierarchies
- 7. Keep Track of Changes With the Page History Feature
- 8. Showcase Your Pages with the Gallery Layout
- 9. Control Page Access With the Page Permissions
- Pages vs. Subpages – What is the difference?
- Productivity in Notion Thrives With Organization
1. Add a “Table of Contents” to Long Pages
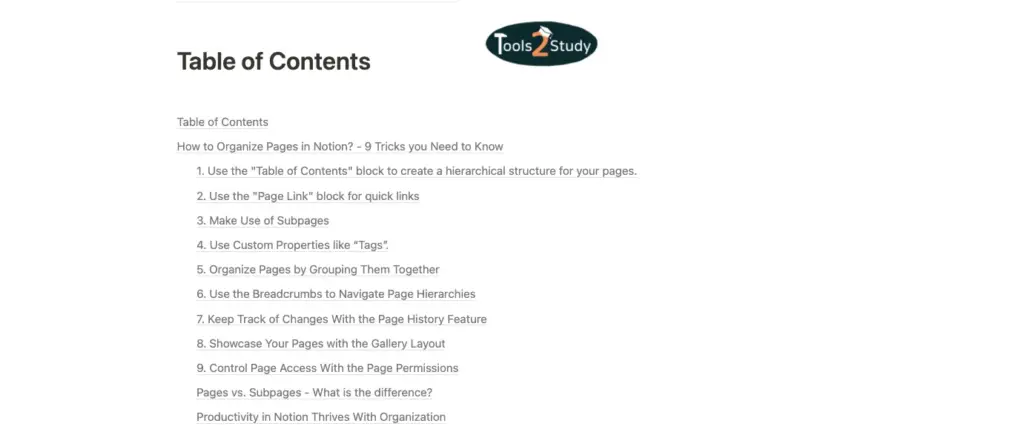
The “Table of Contents” block is a powerful tool for organizing your pages With it, you can create an ideal overview for your pages making it easy to find what you’re looking for.
To use the block, simply add a new block to your page, and select “Table of Contents” from the menu. This will insert a block that displays all the headlines of a page. When you click on these you’ll jump directly to the respective headline.
Overall, the “Table of Contents” block is a great way to create a visual map of your pages, and make it easy to navigate through your work.
2. Use the “Page Link” Block For Quick Links
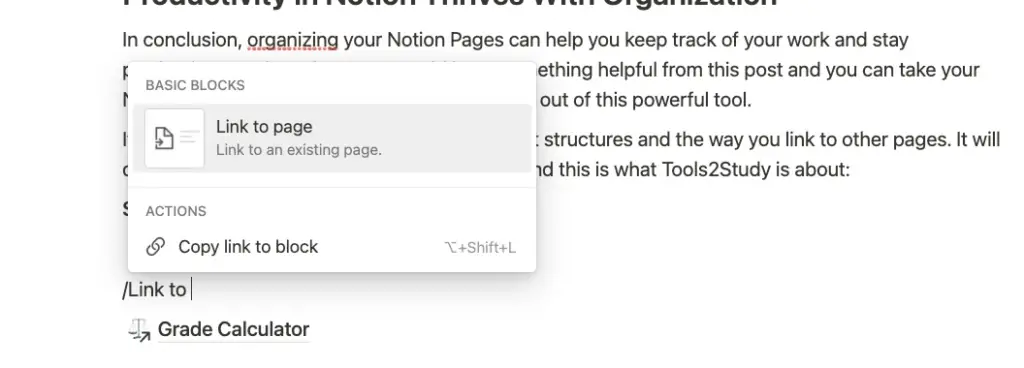
Another useful trick for organizing your pages is to use the “Page Link” block to create links between pages. This can help you create a web of interconnected pages, making it easy to navigate between them.
To use the “Page Link” block simply add a new block and select “Page Link” from the menu. This will insert a block that allows you to choose a page to link to. You can also customize the display of the link, and even add an icon to help identify the link.
Using the “Page Link” block can be a great way to create a “home base” page that links to all of your other pages. This can make it easy to find your way around your work, and quickly access the pages you need.
3. Make Use of Subpages
In Notion, pages and subpages are used to organize and structure your work. Using subpages can be a great way to implement a topic hierarchy where the subpages are more in-depth and the top pages rather provide a more general overview.
Here are 4 reasons why you should use them:
- They allow you to create hierarchies within your pages, so you can group related information together and easily navigate between them. This can help you find the information you need quickly and avoid clutter.
- They enable you to break down complex topics into smaller, more manageable pieces. This can help you focus on one aspect of your work at a time and avoid getting overwhelmed.
- Subpages can make your pages more readable and user-friendly. By organizing your information into smaller chunks, you can make it easier for others to understand and follow.
- They can help you stay organized and keep your work consistent. By using the same structure for your subpages, you can ensure that your information is presented in a logical and consistent manner.
In a nutshell, using subpages in Notion can help you improve the organization and clarity of your information, making it easier for you and others to access and understand. Whether you are working on a personal project or collaborating with a team, using subpages can be a valuable tool for staying organized and productive.
4. Use Custom Properties like “Tags”

With the “Custom Properties” feature, you can create your own properties to suit your specific needs. This can be a great way to add additional information to your pages and to create custom ways of organizing your work.
For instance, currently, there is no “Tag” property by default but you can create a custom one with just a few clicks. For that, you just have to follow these steps:
- Create a new property by simply typing “Tag” into the property field and adding it.
- Change the property type to “Multi-Select”
- Add your custom Tags to the database entries.
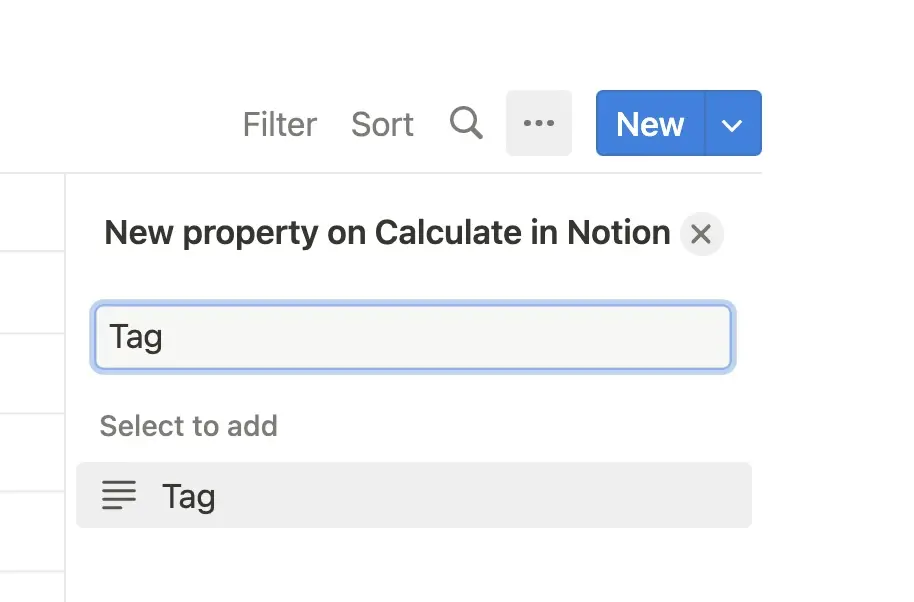
The “Tag” property is a useful feature that allows you to add keywords to your pages, making it easy to filter and group your pages by tags.
In this case, “Tag” is a perfect example of the custom properties feature but of course, there are countless other use cases for that.
5. Organize Pages by Grouping Them Together
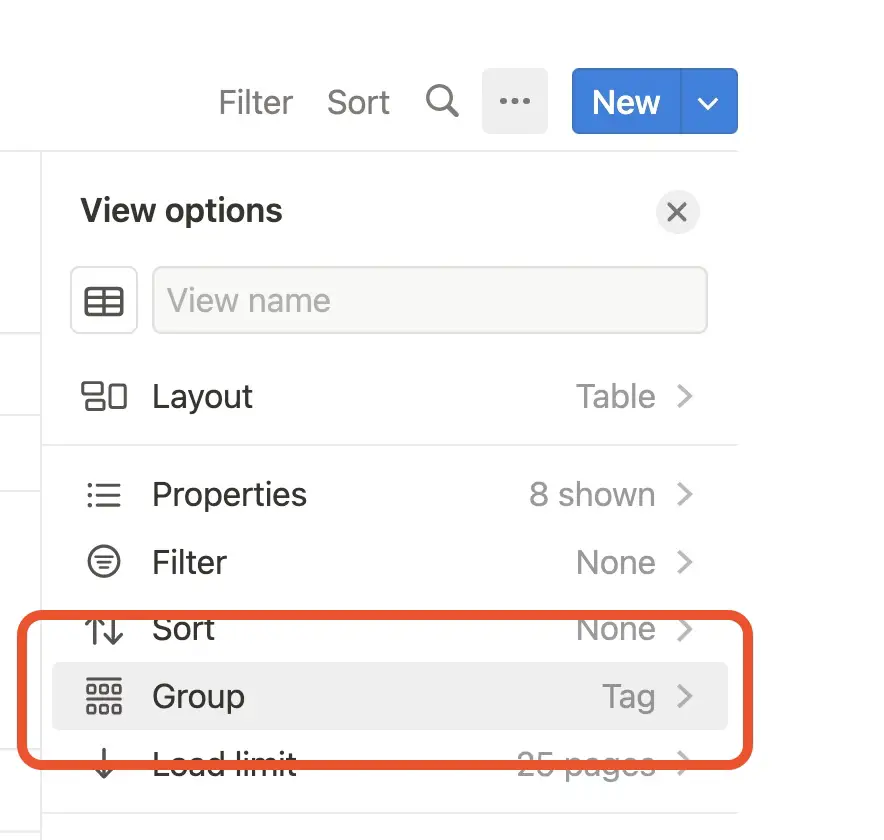
Again, this tip is meant for databases containing Notion pages. There, you can group pages depending on your specific needs and how you want to organize your work.
These are the steps to group pages in Notion Databases:
1. click on the 3 dots above the database.
2. choose “Group”
3. click on “Group by” and choose the property you want to group the pages by (e.g. “Tags”)
6. Use the Breadcrumbs to Navigate Page Hierarchies

It is not always easy to navigate your way through Notion. Especially when you have countless pages and subpages like I do. But fortunately, Notion’s breadcrumbs are a very helpful feature to help with that.
They allow you to display the hierarchy of your pages at the top of each page, showing the current path of the page you are using. Breadcrumbs are enabled by default. So you don’t have to do something to use them.
7. Keep Track of Changes With the Page History Feature
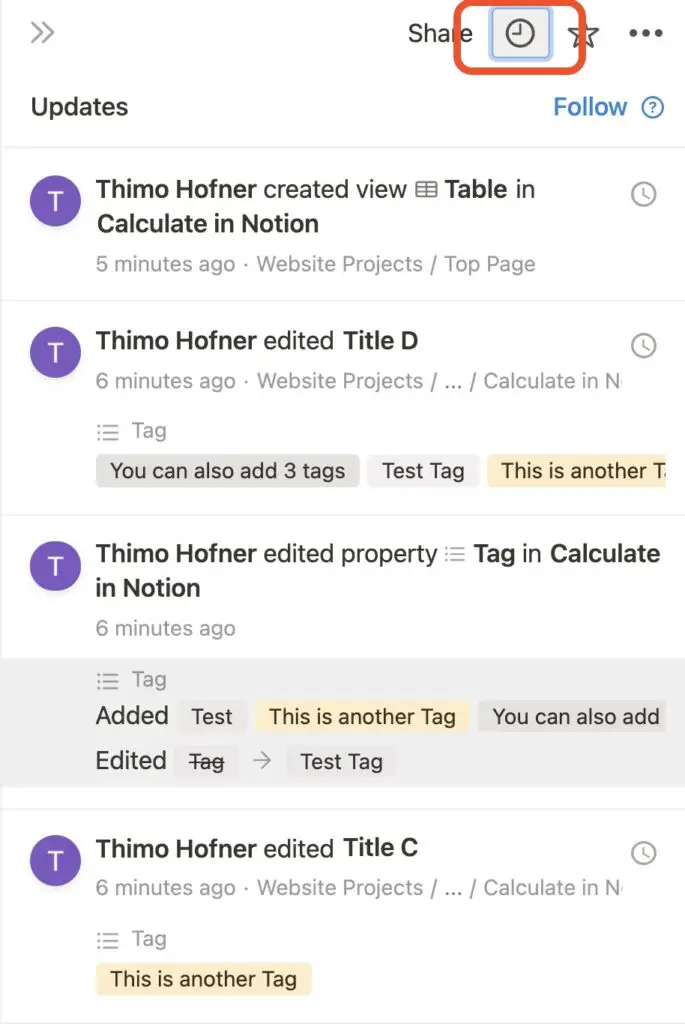
It has not been long since Notion added the option to view a 7-day page history in the Free Plan. Before that page history was only available in the paid plans.
So now Notion users can at least see the changes of the past 7 days for every one of their pages. To see it, you just have to click on the clock icon in the top right corner of every page.
There you can see your own as well as the changes of other members or guests. If you want to restore a version you simply have to click on the clock icon for the respective page update to view this version.
Then you click on “Restore version”
8. Showcase Your Pages with the Gallery Layout
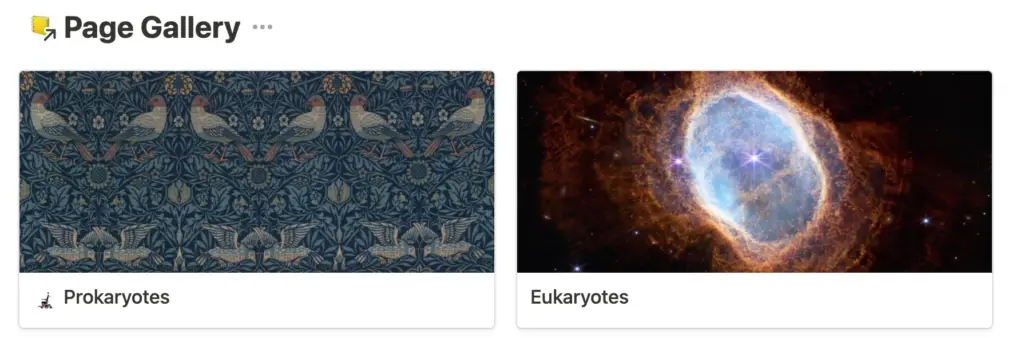
In Notion, you can display your databases in different ways. My favorite one is the “Gallery” layout. It allows you to display your pages as a grid of images or cards. This can be a useful way to organize and present your pages.
To use the “Gallery” option, simply navigate to the settings above the database and choose “Layout”. There you just choose “Gallery”.

You have different setting options to edit the style of the page gallery:
- Card Size: You can choose between small, medium and large
- Card Preview: Choose which image should be shown on the card
- None
- Page Cover
- Page Content (the first image used on the page)
- Image (Choose a custom one)
The page title and icon are shown by default. Also, you have the option to disable the database title, the fitting of the preview image and the way pages will open when you click on them.
One potential use for the “Gallery” layout is to create a portfolio or showcase of your work. You could create a page for each project you’ve completed and use it to display them as a grid of images or cards. This can make it easy for others to quickly browse and discover your work.
9. Control Page Access With the Page Permissions
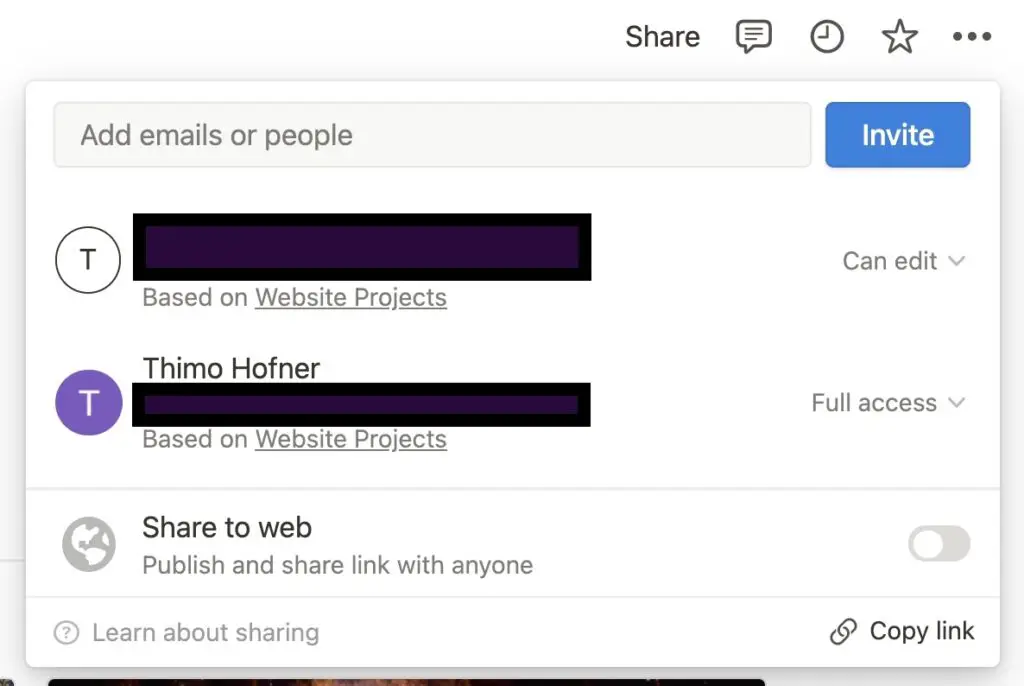
The “Page Permissions” feature in Notion allows you to control who can access and edit your pages. This can be useful for protecting sensitive information, or for collaborating with others on your work.
To set the “Page Permissions” for a page, simply click on “Share” in the top-right corner of your page. There you can see who has access to the page and with which permissions.
Another way would be to click on “Settings & members” and navigate to “members”. There you can see an overview of everyone who has access to your Notion setup and to which pages.
Keep in mind that guests have also access to all the subpages of the page they were invited to. Members on the other hand have access to your whole workspace if you do not restrict that in any way.
If you want to know more about the differences between guests and members, you can check out this article: Guests vs. Members.
Pages vs. Subpages – What is the difference?
In Notion, pages and subpages are used to organize and structure your work. A page is a top-level element in your Notion workspace, and it can contain any type of content, such as text, images, files, or other blocks.
A subpage, on the other hand, is a page that is nested within another page. This means that it is a part of a larger page, and it can be accessed by clicking on a link within the parent page.
One key difference between pages and subpages is that pages can be accessed directly, while subpages can only be accessed through their parent page. This means that pages are like the main topics or sections in your work, while subpages are like the subtopics or subsections.
Another key difference is that pages and subpages can have different properties and formatting. For example, you can use the “Page Link” block to create links to pages, but not to subpages.
Productivity in Notion Thrives With Organization
In conclusion, organizing your Notion Pages can help you keep track of your work and stay productive. For that, I hope you could learn something helpful from this post and you can take your Notion Pages to the next level and get the most out of this powerful tool.
It really is worth the time to think about the right structures and the way you link to other pages. It will definitely help you to work and learn smarter. And this is what Tools2Study is about:
Study smart, not hard 🎓